

Pillowcase Tutorial
For every holiday or special occasion I make my wee ones a pillowcase that matches the theme of that holiday or special occasion. I will also, most times, make them matching pajama bottoms. It has become a bit of a tradition for us and my children always look forward to receiving them. Making the pillowcase is very fast and incredibly simple! With Valentine's Day only a day away I need to get my rear in gear and start sewing so as to not disappoint the little buggers. And while I am at it, I thought I would post my first tutorial. So Peggy, if you are reading this post, this tutorial is for you!!
This is just for a very basic standard size pillowcase. I will later post tutorials on how to make them more frilly and what not using different types of trims. Enjoy!

3/4 yard fabric for pillowcase body cut into a piece that is 27" x width of the fabric
11" x width of the fabric for the cuff edge
Basic Supplies:
thread
scissors/rotary cutter
cutting matt
pins
You will first want to wash and iron your fabric before cutting and sewing. Once finished ironing, locate your camera that has been taken hostage by a 4-year old photographing herself. Retrieve your camera once a deal has been made with the 4-year old. (Usually anything containing sugar will win this particular 4-year old over.)


Cut your fabrics to the dimensions below:
pillowcase body= 27" x width of the fabric
cuff = 11" x width of the fabric
 |
pillowcase body is the pink fabric with skunks the cuff is the squiggly print fabric |

Then place the pillowcase body fabric right side down on top of the cuff fabric, lining up the top raw edges and pin in place.


You may find that your selvage sides do not match up, therefore, go ahead and trim the selvage edges to the same width.


Now you will begin rolling the pillowcase body fabric
until you reach the bottom edge of your cuff fabric.

 Roll until you are able to grab the cuff fabric.
 Then pick up the cuff fabric and bring the cuff fabric up to the raw edges that have been pinned.

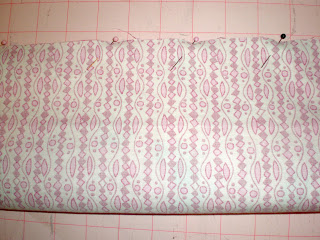
The cuff fabric will now be on the outside of the fabric wrong side out and the top of the cuff, top of the pillowcase body and bottom of the cuff will now be pinned together. The pillowcase body will be rolled up inside the tube that you have created.
Now sew along the pinned edge using a 1/4" seam allowance.
Then search for my tiny scissors that I prefer to cut threads with. Pesky 4-year old had decided to play hide and seek with them earlier that afternoon and I am now unable to locate them. Because it is very late at night and the 4-year old is now sleeping ever so peacefully, I opt to let her sleep rather than wake her, demanding to know where she has hidden them. Grrrr.....proceed with a crummy, dull scissors until tomorrow when, hopefully, favored tiny scissors will be found!!
(I then went back and did a zig zag stitch along the same edge. You may or may not choose to. Completely up to you.)


If you like, iron again to set the topstitching. Fold the pillowcase right sides together and pin. Sew the bottom and the side edge followed by doing a zig zag finish along the edges.

Turn your pillowcase right side out, push out the corners and give it a final press.
Now marvel at your creation!!
You can have these made in well under a 1/2 hour from start to finish.
I also like to make toddler/travel size pillowcase. Follow
the steps above only using the following dimensions below:
Toddler/Travel Pillow
8.25" x 24.25" for cuff
14.25" x 24.25" for pillowcase body


Happy Valentine's Day!
Proudly linking up to the following:
 |

You will now remove the pins and re-pin so that all the fabric is lined up and pinned together again. This will create a tube.

The cuff fabric will now be on the outside of the fabric wrong side out and the top of the cuff, top of the pillowcase body and bottom of the cuff will now be pinned together. The pillowcase body will be rolled up inside the tube that you have created.
Now sew along the pinned edge using a 1/4" seam allowance.
Then search for my tiny scissors that I prefer to cut threads with. Pesky 4-year old had decided to play hide and seek with them earlier that afternoon and I am now unable to locate them. Because it is very late at night and the 4-year old is now sleeping ever so peacefully, I opt to let her sleep rather than wake her, demanding to know where she has hidden them. Grrrr.....proceed with a crummy, dull scissors until tomorrow when, hopefully, favored tiny scissors will be found!!
(I then went back and did a zig zag stitch along the same edge. You may or may not choose to. Completely up to you.)

Once edge has been sewn, reach inside the tube and turn fabric right side out.
The seam allowances have now been magically hidden inside the
cuff! Amazing isn't it? I was in complete awe the first time I ever
did this.

Press the pillowcase flat.

I then did a topstitch along the cuff (bottom of the cuff where the pillowcase
body and cuff meet and also along the top edge of the cuff. Again, entirely up to you if choose to do this. I
like how it looks and it helps keep the hidden seam from
bulking up after multiple washings and drying. I am not into
having to iron my linens after washing and drying and this seams to help
prevent the unwanted ironing chore).

If you like, iron again to set the topstitching. Fold the pillowcase right sides together and pin. Sew the bottom and the side edge followed by doing a zig zag finish along the edges.

Turn your pillowcase right side out, push out the corners and give it a final press.
Now marvel at your creation!!
You can have these made in well under a 1/2 hour from start to finish.
I also like to make toddler/travel size pillowcase. Follow
the steps above only using the following dimensions below:
Toddler/Travel Pillow
8.25" x 24.25" for cuff
14.25" x 24.25" for pillowcase body

Happy Valentine's Day!
Proudly linking up to the following:


Great directions. I like your idea on how to attach the cuff to the main material.
ReplyDelete~Kimberlee
www.TheSpunkyDiva.com
Thanks for the tutorial! I just bought some Yogi Bear fabric to make a pillowcase for my son yesterday. I found you through Made By You Mondays and am now a follower.
ReplyDeleteMelanie
youmadethat.blogspot.com
Thank you so much, Melanie! If you have any questions about the project, feel free to contact me. I started poking around on your blog, but my wee ones, of course, starting to get a bit obnoxious so I decided to play the "Take Charge Mommy" role. The little that I got to read made me giggle in regards to your children. It's refreshing to see other moms with similar thoughts when it comes to kids. I will be visiting frequently!
ReplyDeleteThank you Kimberlee!
ReplyDeleteThanks for sharing this easy to follow tutorial.
ReplyDeleteYou really make the project look so easy, like anyone can do it. The directions (with pictures) actually make me want to go and get fabric and try one. Thanks
ReplyDeleteThanks for the tutorial - I just made a St. Patrick's Day one for my God Daughter. I'm sure she will love it and that I will be making many more (and that her mother will LOVE me!)
ReplyDeleteWhat a great tutorial, I love your little trick to keep the seems hidden! I am having a pillow contest {Pillow Fight--For a Cause} On my blog this month, and would love it if you would consider entering. Link below!
ReplyDeleteCarlee
http://www.ladybirdln.com/2011/05/pillow-fight-for-causepart-1.html
OMG Amy you have amazing talent and are so creative. After struggling to find a really easy - seamless way to attach the cuff and body of my pillowcases...this is by far the easiest and cleanest looking set of pillow cases I have made thus far! Thanks so much for your tutorial, it was the BEST!!!!!!
ReplyDelete